Creating an Employer Account
Creating an employer account grants access to JobLink's full range of resume search options. Build or upload your job postings and take advantage of JobLink's recruitment and labor information services. Creating an employer account is free and allows you to post jobs. Search our database, which holds thousands of resumes, and save resume search profiles for future use as well. This page walks you through the steps to create an employer account. It also explains how to edit or update your account information.
Self-Service vs. Staff-Assisted
JobLink gives you the choice between self-service or staff-assisted job postings. You manage your own job postings and recruitment efforts through self-service. Staff-assisted job postings allow workforce staff at your local American Job Center to manage your jobs.
You can ask for assistance from your local American Job Center at any time. If you begin by creating a self-service account, you can still request help. Job Center staff are trained to assist in multiple ways. They answer hiring and labor market questions, process job orders, and contact job candidates for interview. To find your nearest job center, view the info in the Contact Us area in the footer of any page.
Creating an Employer Account
- You can enter the account creation process in several places across the JobLink website:
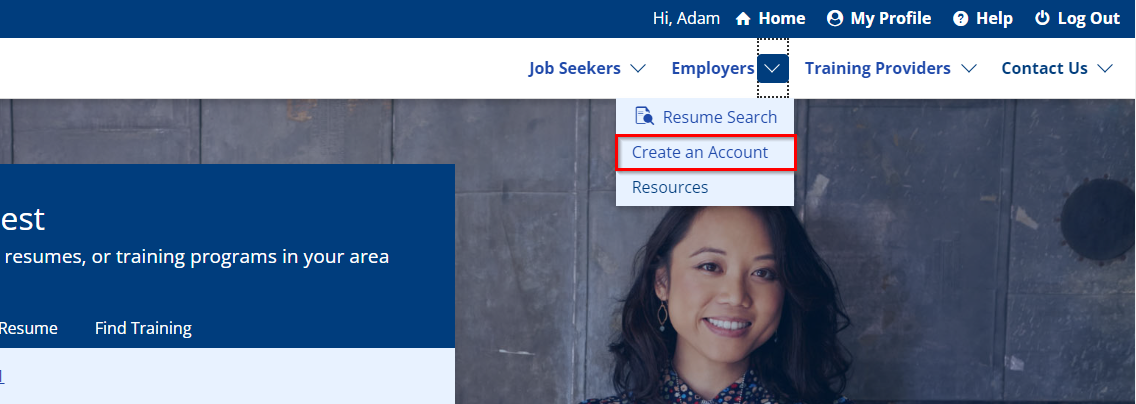
- On the JobLink home page, in the top navigation menu, select the arrow to the right of Employers, then select Create an Account from the drop-down list.
- In the bar that reads Need an account? Create one now!, select Employers.
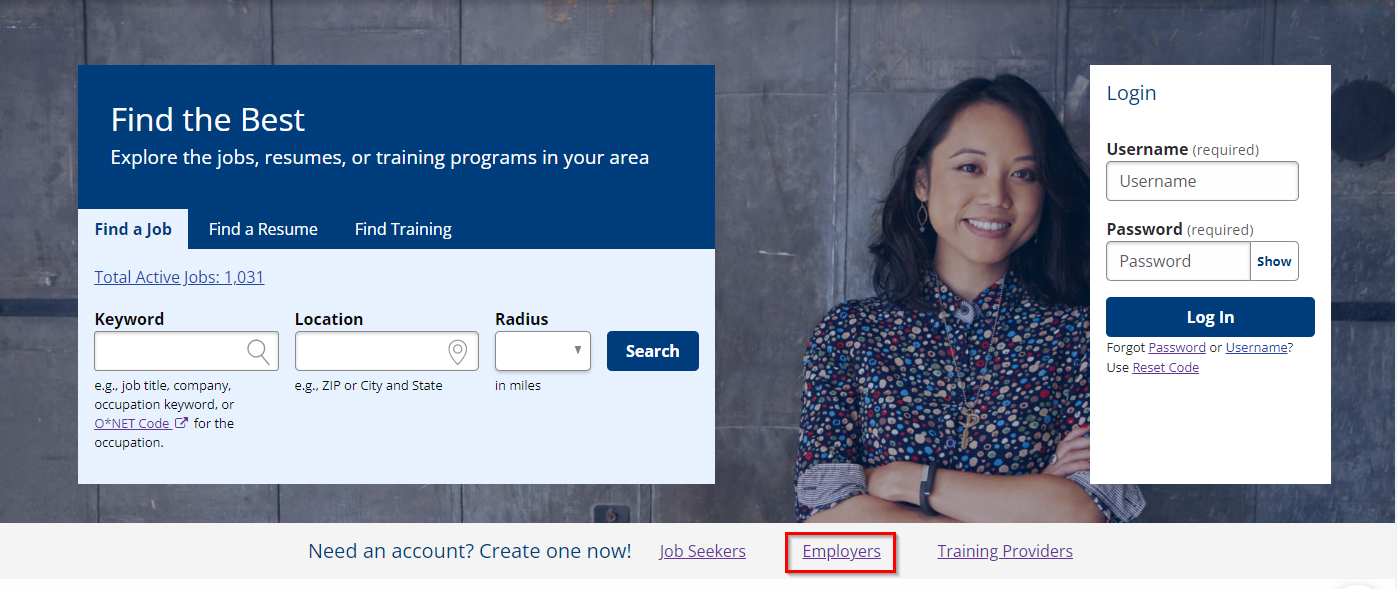
- From the Employers landing page, next to the login fields, under Need an account?, select Create one now!
- On the JobLink home page, in the top navigation menu, select the arrow to the right of Employers, then select Create an Account from the drop-down list.
- On the Employer Agreement Policy page, carefully read the information and select Accept or Decline. Text on the Employer Agreement Policy varies by state.
- Selecting Accept shows you have read, understood, and agree to comply with the Employer Agreement Policy. The Employer Lookup page displays.
- Selecting Decline shows you have read and understood the Employer Agreement Policy, but you cannot, or choose not to, comply with it. This ends the account creation process and directs you to the JobLink home page.
- Type your company's FEIN and SEIN on the Employer Lookup page.
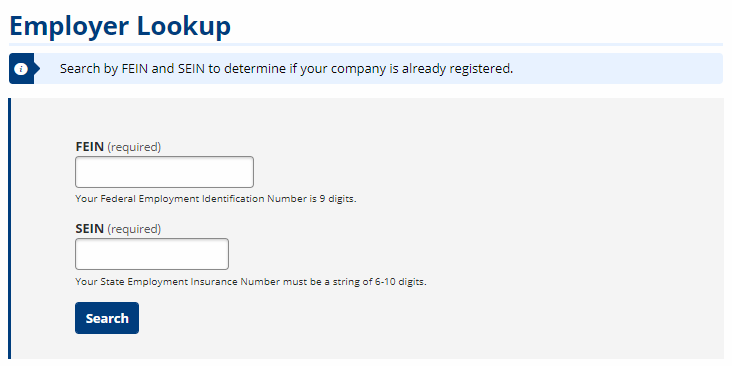
- SEIN stands for State Employer Identification number. Your state may request an SUIN, which is a State Unemployment Insurance Number, or an EAN, which is an Employer Account Number.
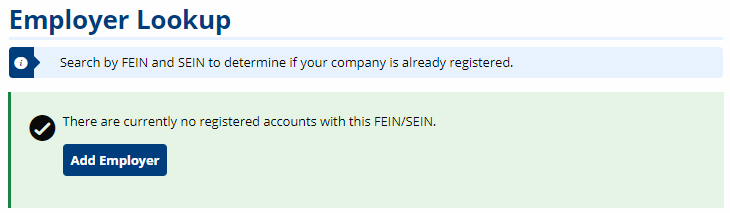
- If no matches are found for the FEIN and SEIN, a confirmation message displays. Select Add a New Employer to go to the Create an Employer Account page.
- If a match is found for the FEIN or SEIN, a validation message displays. You may choose to continue your registration by selecting Continue With Warnings.
- Do not create multiple accounts for multiple company locations. One employer account can manage job postings for multiple locations through the function.
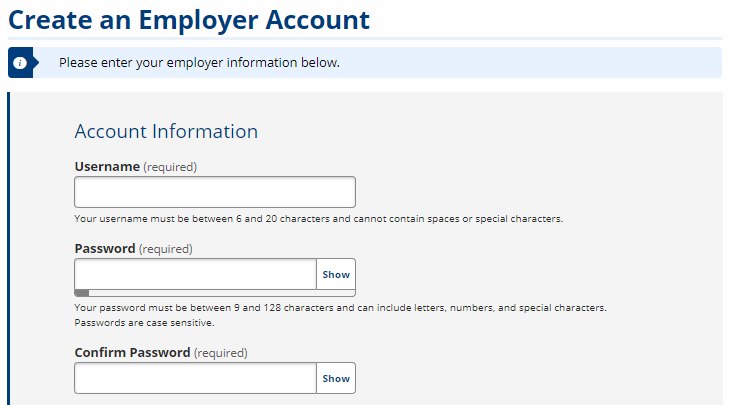
- The Create an Employer Account page displays. Provide, at a minimum, all required fields on this page. Required information is marked throughout. Complete the fields according to the instructions.
- Select Create Employer when complete.
To view details about the questions asked, review the table below. Note that each question includes a brief description.
| Field | Description |
|---|---|
| Username | (Text) Enter a username. Usernames must be between 6 and 20 characters and cannot contain spaces. |
| Password | (Text) Enter a password.
|
| Confirm Password | (Text) Re-enter your password. |
| Security Question | (Drop-Down) Choose one of the security questions. These help validate your identity if you forget your password and need to recover it. |
| Security Question Answer | (Text) Enter the answer to your selected Security Question. Answers are not case sensitive. |
| (Text) Enter your email address as the person managing the account. | |
| Email Confirmation | (Text) Re-enter the email address. |
| Employer Information | |
| Provide the following information about the employer. The contact information does not display publicly unless you choose to show it on your job postings. | |
| Company Name | (Text) Enter the company name. |
| Company Description | (Text) Enter a description of the company.
|
| Website | (Text) Provide the URL of your company’s website. |
| FEIN | (Display Only) The Federal Employer Identification Number displays as entered on the Employer Lookup page. |
| SEIN (or SUIN/EAN) | (Display Only) The State Employer Identification Number displays as entered on the Employer Lookup page. |
| How many people do you employ? | (Radio) Select the option that corresponds with the approximate number of current employees. |
| Which of the following best describes your company? | (Radio) Select the option that corresponds with the appropriate company ownership designation: Federal Government, State Government, Local Government, or Private Sector. |
| Are you a third party recruiter or staffing agency? | (Radio) Select Yes or No. |
| Are you a federal contractor? | (Radio) Select Yes or No. Select Yes if you are party to any government contract or subcontract of $100,000 or more. |
| Are you a green industry employer, and if so, which industry? | (Drop-Down) Select the sector that best describes your company’s participation in environmentally and economically sustainable business. Only one sector can be chosen. If this does not apply, select N/A. |
| Primary Contact | |
| Provide the name and title of the person who should be contacted for any questions regarding this account or its job postings. | |
| First Name | (Text) Enter the first name of the primary contact. |
| Last Name | (Text) Enter the last name of the primary contact. |
| Contact Title | (Text) Enter the primary contact’s job title. |
| Phone | (Digits) Enter the primary contact’s primary phone number. |
| Primary Location | |
| Provide the company’s address. If your company has more than one address or has headquarters outside of the state, please provide the main address located within the state. | |
| Address Line 1 | (Text) Enter the company's street address.
|
| Address Line 2 | (Text) Enter any additional address information, such as building or suite number. |
| ZIP | (Digits) Enter the company's ZIP code. Once you select a suggested ZIP from the list or tab/click away from this field, the City and State fields automatically populate based on the ZIP entered. |
| City | (Text) The city in which the company is located. This is automatically populated from the ZIP but can be manually modified or entered if needed. |
| State | (Drop-Down) The state in which the company is located. This is automatically populated from the ZIP but can be manually selected if needed. If the company is not located in the United States, select --International--. |
| County | (Drop-Down) Select the county in which the company is located. |
| Country | (Drop-Down) Select the country in which the company is located. Defaults to United States. |
| International State/Province | (Text) (This question displays if a country other than the United States is selected.) |
| International Postal Code | (Text) If the business is located outside of the United States, enter the postal code. (This question displays if a country other than the United States is selected.) |
| Profile Information | |
| Provide the following information about yourself as the person managing this employer account. The information may be used to verify your relationship to the employer. | |
| First Name | (Text) Enter your first name. |
| Middle Initial | (Text) Enter your middle initial. |
| Last Name | (Text) Enter your last name. |
| Phone | (Digits) Enter your contact number. Check the box below this field to opt-in to text messages. |
| Cell Phone | (Digits) Enter your cell phone number.
|
| Fax | (Digits) Enter your fax number. |
| Use same address as employer. | (Check box) Clear this checkbox if the information you are using for your address is not the same as the employer. (The default is set for it to be selected.) |
| Address Line 1 | (Text) Enter the address at which you are located. |
| Address Line 2 | (Text) Enter any additional address information, including apartment or building number. |
| ZIP | (Digits) Enter the ZIP code of residence or office location. Once you select a suggested ZIP from the list or tab/click away from this field, the City and State fields automatically populate based on the ZIP entered. |
| City | (Text) Enter the city of residence or office location. This is automatically populated from the ZIP but can be manually modified or entered if needed. |
| State | (Drop-Down) Select the state of residence or office location. This is automatically populated from the ZIP but can be manually selected if needed. If you are located outside of the United States, select --International--. |
| Country | (Drop-Down) Select the country of residence or office location. The United States is the default selection. If you choose a country other than the United States, fields to enter your international state or province and postal code display. |
| International State/Province | (Text) If you are outside of the United States, enter the international state/province as appropriate. (This question displays if a country other than the United States is selected.) |
| International Postal Code | (Text) If you are outside of the United States, enter the postal code. (This question displays if a country other than the United States is selected.) |
| How did you hear about our services? (Check all that apply.) | (Check box) Select the ways in which you heard about our services. You can select more than one. This question and its options may vary by state. |
Employer Approval
Your completed account information is routed to state-designated staff for approval. The approval process typically takes 2-3 business days. If more information is needed to approve your account, you will be contacted. You can create job postings while you are awaiting approval (some states require you have a job posting to be approved). Your job postings will be visible to job seekers when your account is approved.