Add Job Posting
AJL provides the ability for creating self-service and staff-assisted job postings. Employers may request job center assistance by selecting the staff-assisted option when creating a job posting. The employer cannot change this selection after the job posting is created, but they can view, edit, and close the job posting at any time. Job center staff cannot create self-service job postings, but they may be able to view or edit self-service job postings created by the employer depending on their security level. All job postings created by job center staff are automatically designated as staff-assisted.
Click here to download the PDF desk aid for this topic.
Navigation
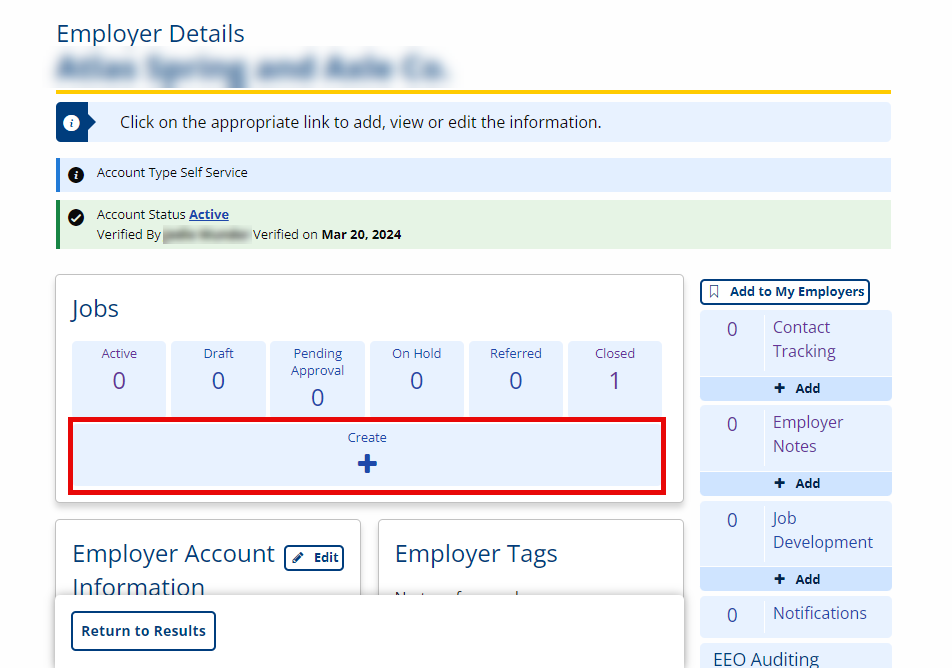
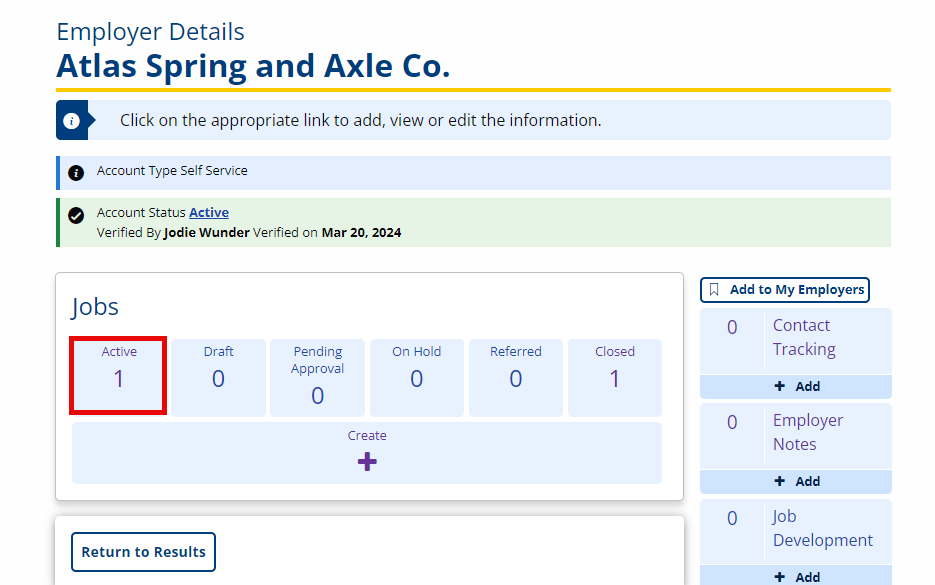
Bring the employer into context by conducting an Employer Search or selecting the employer from My Employers. If your search returns multiple accounts for the same employer, use the staff-assisted account if one exists; however, if your search returns only one account for the employer, you may use it to create job postings regardless of whether the account is labeled as Self-Service or Staff-Assisted. Use the employer context menu to navigate to Employer Details, then click Active Jobs on the Employer Details page.
Add New Job Posting
- In the Employer Details page, click Create in the Jobs tile. The Post a Job page displays.
All job postings created by job center staff are automatically designated as staff-assisted.
- Creating a job posting is a six-step process. Step 1 is Job Overview.
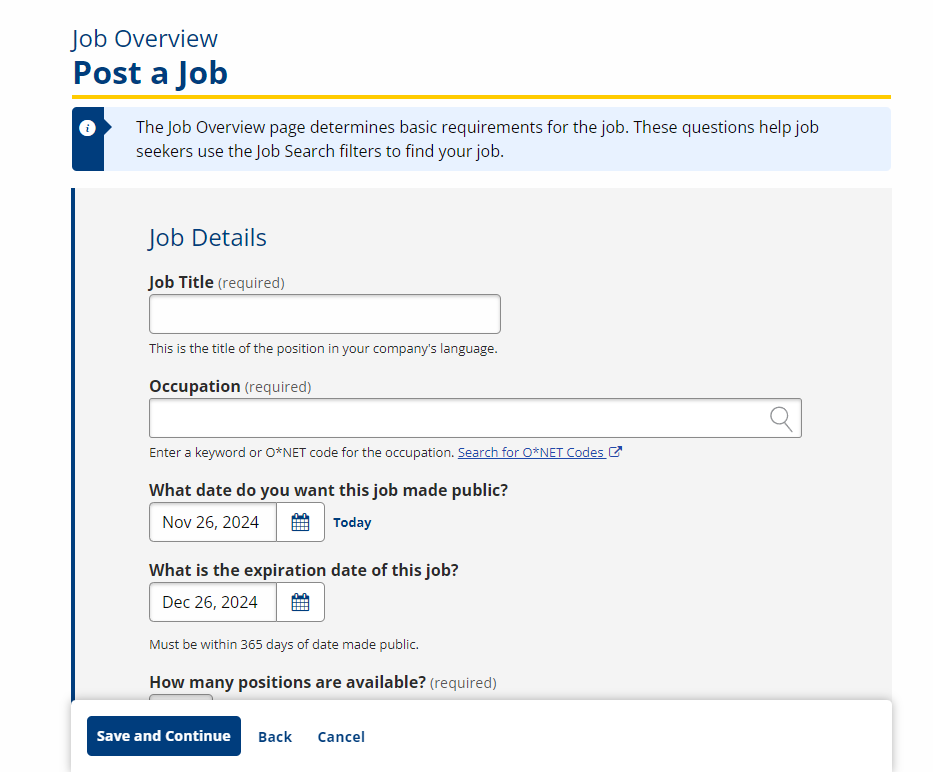
Answer all of the required questions. Some information is optional. However, the more information you provide, the more attractive the job posting will be to job seekers. It will also help AJL provide the employer with better automatic resume matches. The following list is a description of fields on the Post a Job page.
- Job Title: Text; Type the job title. A more specific job title will result in better resume matches.
- Occupation: Enter a keyword related to the career for which you are posting the job. A drop-down list of matches displays as you type. The occupation you select is connected to an Occupational Network (O*NET) code, and this code is used for job matching and to create an objective statement and summary of qualifications. Select the occupation that most closely matches the job you are posting. If no occupations are displayed or if none match your desired occupation, provide a different keyword.
- What date do you want this job made public? Text/Calendar; Select the date for the job posting to be made public; defaults to the current date.
- What is the expiration date of this job? Text/Calendar; This field automatically defaults to 30 days from the publication date entered (45 days for Maine and Vermont). The expiration date is the date you want the job posting to close. Expired job orders move to your On Hold jobs list and are not visible to job seekers. If you want a different expiration date, enter the new date or use the calendar to select the date. This date cannot be past a certain number of days from the publication date selected in the previous field. This number varies depending on your state.
If the job supports H-2A Recruitment Activities, the expiration date can be up to 365 days from the publication date.
- How many positions are available? Text; type the number of positions available for this job. Please contact your local American Job Center if the number of the positions for this posting exceeds 99. If the positions are supporting H-1B, H-2A, or H-2B recruitment activities there is no limit to the number of positions.
- Does this job offer opportunities for remote work? Option; If Yes, please provide additional information in the job description, such as whether the remote work accommodations are partial (e.g., 3 days/week from home, 2 days/week in an office location),permanent, or temporary.
- Is travel required for this job? Option; Select Yes or No.
- Is driving an essential function of this job? Option; Select Yes or No.
- Can this job be accessed by public transportation? Option; Select Yes or No.
- How many years of experience are required for this job? [Years and Months] Text/Arrows; Type the years and months of experience required for the job or use the up and down arrows to set the years and months.
What education level is required for this position? Drop-down; Select the education level required for this position. If you select Some High School or Less or High School Diploma or Equivalent, you may also select the required minimum educational functioning level. To learn more about educational functioning levels, click the EFL Descriptions link. Select from the following options:
- Some High School or less
- High School Diploma or Equivalent
- Vocational Certificate or Credential
- Some College
- Associate's Degree
- Bachelor's Degree
- Master's Degree
- Ph.D
- MD, OD, or Related
- DDS, DMD, or Related
- JD
- Other Professional Degree
- Is this position an Internship or externship? Option; Select Yes or No.
Shift(s): Checkboxes; Select all that apply from the following options:
- Day Shift
- Evening Shift
- Night Shift
- Rotating Shift
- Split Shift
- Multiple Shifts Available
- Describe any other shift schedules for this job. Text; Describe any details about shifts.
Is this job part-time or full-time? Option; Select from the following options:
- Full Time
- Part Time
- Full or Part Time
- See Job Description
Is this job temporary or permanent? Option; Select from the following options:
- Permanent
- Temporary
- Both
- See Job Description
- Average hours per week: Text; Type the average number of hours per week for the job posting.
Is overtime available for this job? Option; Select from the following options:
- Not Available
- Available
- Mandatory
- Is this job an Affirmative Action job? Option; Select Yes or No.
- Is this a green job? Option; Select Yes or No.
Is this job supporting H-1B, H-2A, or H-2B Recruitment Activities? Option; Select from the following options:
- No
- H-1B Recruitment
- H-2A Recruitment
- H-2B Recruitment
Select the clearance level of this job posting Checkboxes; Select from the following options:
N/A (may only appear if No or H-1B is selected in the previous question)
Local
Intrastate
Interstate
Date of clearance level change Text/Calendar; Enter the date or use the calendar to select the date. You may also click Today to automatically enter today's date.
Attach any supporting forms, such as an approved USDOL 790 If H-2A Recruitment or H-2B Recruitment is selected, click Choose Files and select a supporting form you want to attach. Multiple forms can be attached.
- Is there a formal program for training new employees? Option; Select Yes or No.
- Is your company a Registered Apprenticeship sponsor? Option; Select Yes or No. A Registered Apprenticeship program must be approved and registered with the state.
- Please enter the Apprenticeship Registration Number: Text; Type the number provided by the DOL or state office for apprenticeships. Required if the answer to Registered Apprenticeship is Yes.
- To continue posting the job, click Save and Continue.
- Click Cancel to return to the previouspage.
- After clicking Save and Continue, the job posting saves. If you exit before completing a saved job posting, it will go into Draft status. Job postings in Draft status are automatically deleted in five business days (not counting holidays) if not completed by an employer or staff member.
- Step 2 is Qualifications. The Qualifications page allows you to select the talents, tools, and activities related to the occupation you chose on the Job Overview page. You can search for a specific qualification by keyword, or scroll through the options O*NET has provided. You may skip this step, but selecting qualifications provides more information to job seekers about your job posting and results in better resume matches.
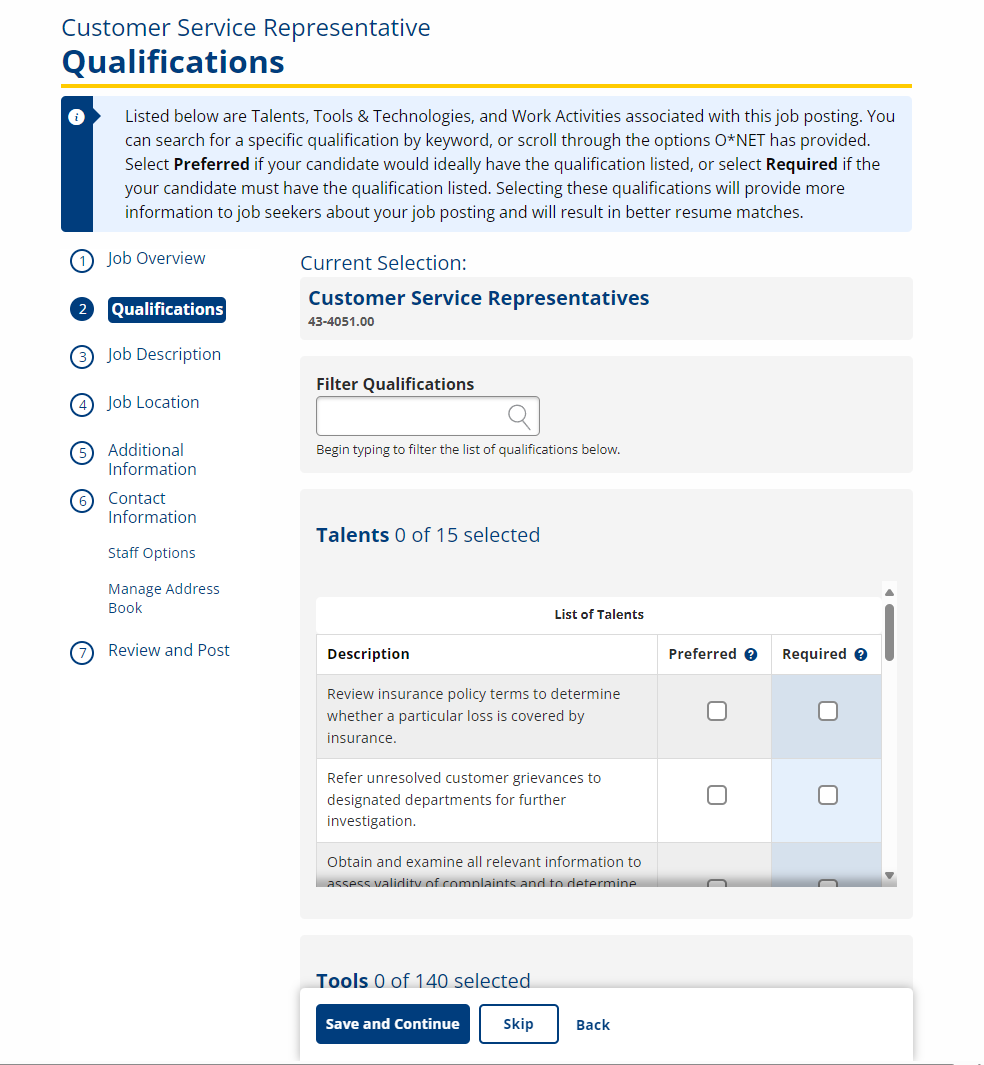
If the qualifications that display are not relevant to your position, consider returning to Step 1 and entering a new occupation title.
Select Preferred if your candidate would ideally have the qualification listed, or select Required if your candidate must have the qualification listed. Qualifications that are Required display on the job posting.
Once all talents, tools, and activities have been chosen, select Save and Continue.
- Step 3 is Job Description. The Job Description page includes wage information, job description, and any special credentials required.
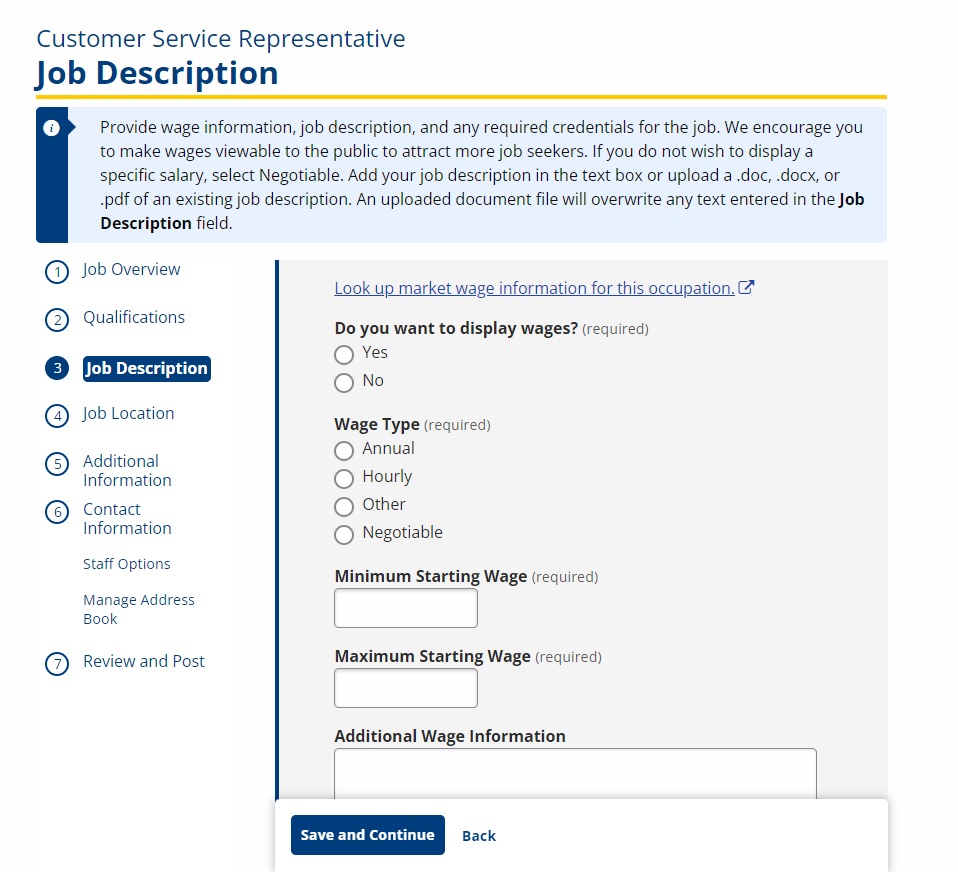
Answer all of the required questions. Remember, the more information you provide, the more attractive the job posting will be to job seekers. It will also help AJL provide the employer with better automatic resume matches. The following list is a description of fields on the Job Description page:- Look up market wage information for this occupation: Link; Click to view CareerOneStop state-specific market wage information in a new window to help employers identify reasonable wages for a job posting.
- Do you want to display wages? Option; Select Yes or No. Select Yes if you want the wage information to be available to job seekers. Showing a wage to the public attracts job seekers. If you select Negotiable below, you do not have to specify an exact wage range.
Wage Type: Option; Select from the following options:
- Annual
- Hourly
- Other
- Negotiable
- Minimum Starting Wage: Text; Type the minimum wage without commas or symbols.
- Maximum Starting Wage: Text; Type the maximum wage without commas or symbols.
- Additional Wage Information: Text; Enter information related to any Other or Negotiable Wage Type chosen above. For example, clarify if the job pays per contract or per mile, or if bonuses are available.
- Display Which Description? Option; If you have a Word document or PDF of a pre-written job description, you may select Upload to upload the document and display that description. Otherwise, select Written to write a new job description.
- If Upload is selected, click Job Description Attachment to upload the document. Only .doc, .docx, or .pdf files up to 10 MB are accepted. Uploading a description overwrites any text you entered in the Job Description text box.
- If Written is selected, enter a high-level overview of the responsibilities for this position in the Job Description text box (12,000 character limit). You can format with bold, italic, and bulleted or numbered lists.
- Look up any credential or licenses related to this job: Link; Selecting this link opens the CareerOneStop website in a new window where you can review any certificates or licenses that may be relevant. Copy the information and paste into the text box if desired.
- List any specific credentials required for this job: Text; (Text) Use the information from the Career OneStop page or list credentials based on your own requirements.
- Step 4 is Job Location. The Job Location page displays location information pre-filled from the employer account. If the location information is different for this specific job posting, you may edit it here. This does not change the information associated with the employer account or with other job postings. The Company Description is pre-filled with the information provided during account creation.
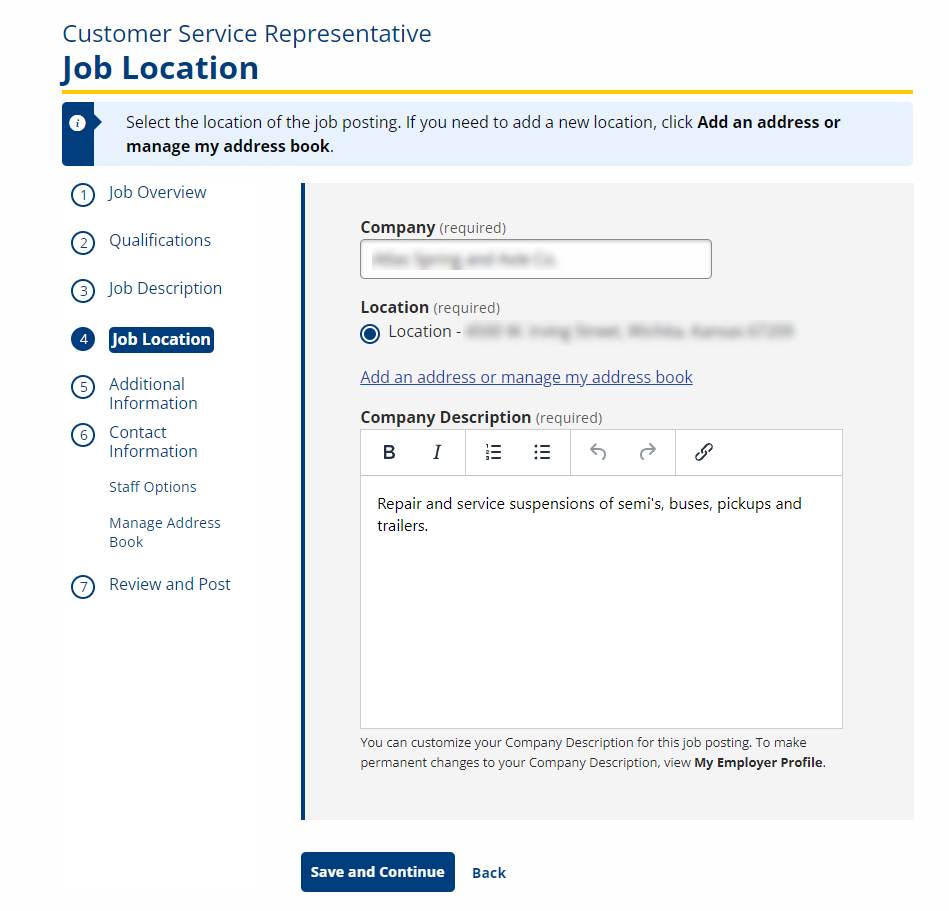
Answer all of the required questions. The following list is a description of fields on the Job Location page:
- Company: Text; Defaults to the company name on the employer account.
- Location: Option; Select the location of this job.
- If the address is not listed, click Add an address or manage my address book to add/edit an address for the employer.
- Company Description: Text; pre-filled with the information provided during account creation. You can edit it if necessary.
- When you are finished, click Save and Continue.
- Step 5 is Additional Information. The Additional Information page includes information on additional benefits the employer provides for this job. Job benefits encourage people to apply and maximize the way wages within the company are viewed. This page also allows you to identify WorkReady! certificate preferences if the employer has a certified ACT Job Profile.

Answer all of the required questions on the Additional Information page. The following list is a description of fields on the Additional Information page:
Job Benefits: Check boxes; Check all benefits that are included with the job. Select from the following options:
- Medical Insurance
- Dental
- Life Insurance
- Paid Time Off
- Retirement Plan
- Disability
- Incentive Pay
- Tuition Reimbursement
- Company Car
- 401K
- Child Care
- Other Benefits: Text; Type any additional benefits not listed above.
Does your company have a certified ACT Job Profile? Option; Select Yes or No. If you have an ACT Job Profile, select Yes. This means that ACT has reviewed your job and determined which skills are required, and at which levels.
If you prefer job seekers with a WorkReady! certificate, indicate the minimum level preferred. Option; If you answered Yes to the previous question, select from the following options:
- Bronze
- Silver
- Gold
- Platinum
- Click Save and Continue.
- Step 6 is Contact Information. The Contact Information page allows you to select how your job posting will display, how job seekers can apply, and your preferences for receiving resume referrals, sharing the job, and asking for job assistance. The available contact methods are entries from your Address Book.
Answer all of the required questions. The following list is a description of fields on the Job Location page:
- How do you want your job to display? Option; Select from the following:
- Public: Job seekers will see all job and contact information.
- Limited: Job seekers will see all job information except company information. They can respond to the job posting through a confidential link.
- Private: Job does not display to job seekers but is available to workforce staff.
- Applicant Reply Method: Checkboxes; Select all the ways applicants may apply for the position:
- Fax
- In Person
- Through Recruiter
- Phone
- Workforce Center
- Application URL
- Company Website
If you select Workforce Center, the contact information displays for the American Job Center managing your job (typically assigned by ZIP code)
- Additional Application Directions: Text; Describe any additional materials or information you would like the applicant to provide. This may include a cover letter, samples of their work, or references.
- Contact Name: Text; The name of the main contact for your company is pre-filled with information from your employer account. Changing the Contact Name here does not change it in your Company Information. To update your Primary Contact, edit your Company Information from your Employer Profile.
- Contact Title: Text; The job title for the main contact listed above. This is pre-filled with information from your employer account. If this information no longer applies, type the new contact title here.
- Manage My Address Book: Link; Select this link to go to Manage Address Book. From there, add, edit, or remove any of the contact methods for your company. Only the contact methods you select in Applicant Reply Method will display on the job posting.
- Contact Address: Option; This list includes all the addresses listed in the Address Book. If the list doesn’t include the address you need, select Manage My Address Book to add a new company address. Once you add the new address, it displays as an option.
- Contact Phone: Option; This list includes all the phone numbers listed in the Address Book. If the list doesn’t include the phone number you need, select Manage My Address Book above to add a new company phone number. Once you add the new phone number, it displays as an option.
- Contact Fax: Option; This list includes all the fax numbers listed in the Address Book. If the list doesn’t include the fax number you need, select Manage My Address Book above to add a new company fax number. Once you add the new fax number, it displays as an option.
- Contact Email: Option; This list includes all the email addresses listed in the Address Book. If the list doesn’t include the email address you need, select Manage My Address Book below to add a new company email address. Once you add the new address, it displays as an option.
- Application URL: Text; If you have a link to your company’s online application form, copy and paste, or type, that URL here.
- Company Website: Option; This list includes all the website addresses listed in the Address Book. If the list doesn’t include the URL you need, select Manage My Address Book above to add a new company website. Once you add the new company website, it displays as an option.
- Do you want to receive resume matches by email? Option; Select Yes or No. The employer must have an email address on file.
- Internal Notes: Text, Enter any other notes regarding this job posting. This information is for internal use only and does not display anywhere on the job posting.
- Share this job on usnlx.com, the National Labor Exchange job bank? Option; Select Yes or No. If you select Yes, the job posting will be exported to NLx, which then shares the job posting on approved job boards. See usnlx.com for more info.
- How do you want your job to display? Option; Select from the following:
- Click Save and Continue.
-
The Staff Options page displays. Answer all of the required questions on the Staff Options page. When you are finished, click Save and Continue. The following list is a description of fields on the Staff Options page:
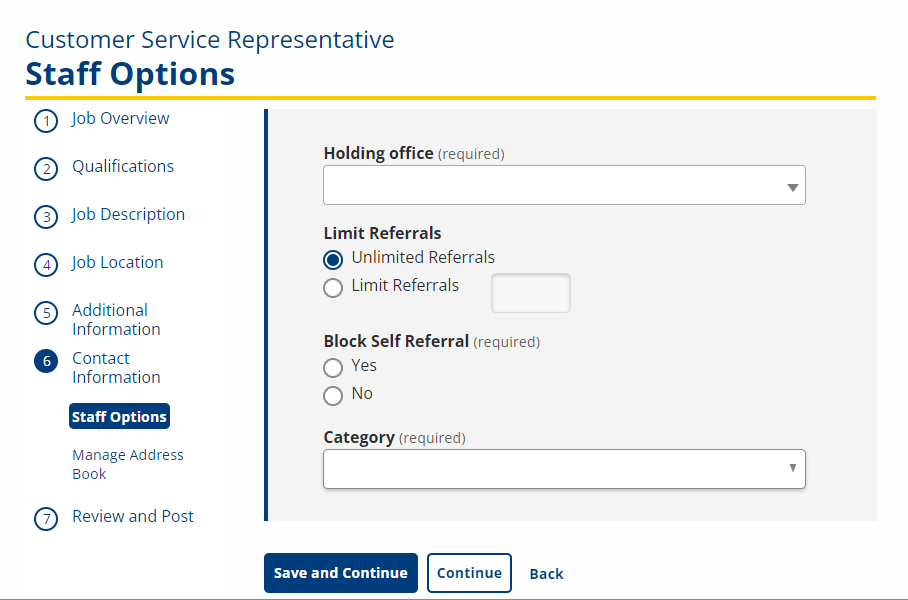
- Holding office: Drop-down; Select a holding office for the job posting. Once established, the holding office cannot be changed. Staff from other offices cannot edit the number of positions or the number of referrals requested on the job posting.
- Limit Referrals: Option; If there is no limit to the number of referrals the employer would like to receive, select Unlimited Referrals. If the employer only wants to receive a limited number of referrals, select Limit Referrals and type the number of referrals in the text box.
- Block Self-Referral: Option; Select Yes or No.
- Category: Drop-down; Select the job category.
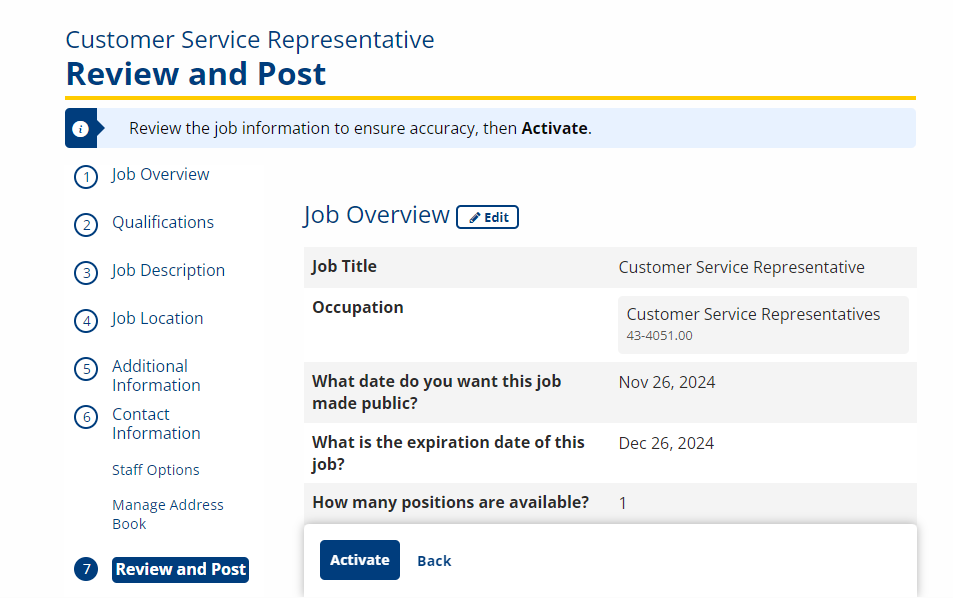
- Step 7 is Review and Post. Carefully review all of the information you provided. To make any changes, click the Edit link at the top of the appropriate section.
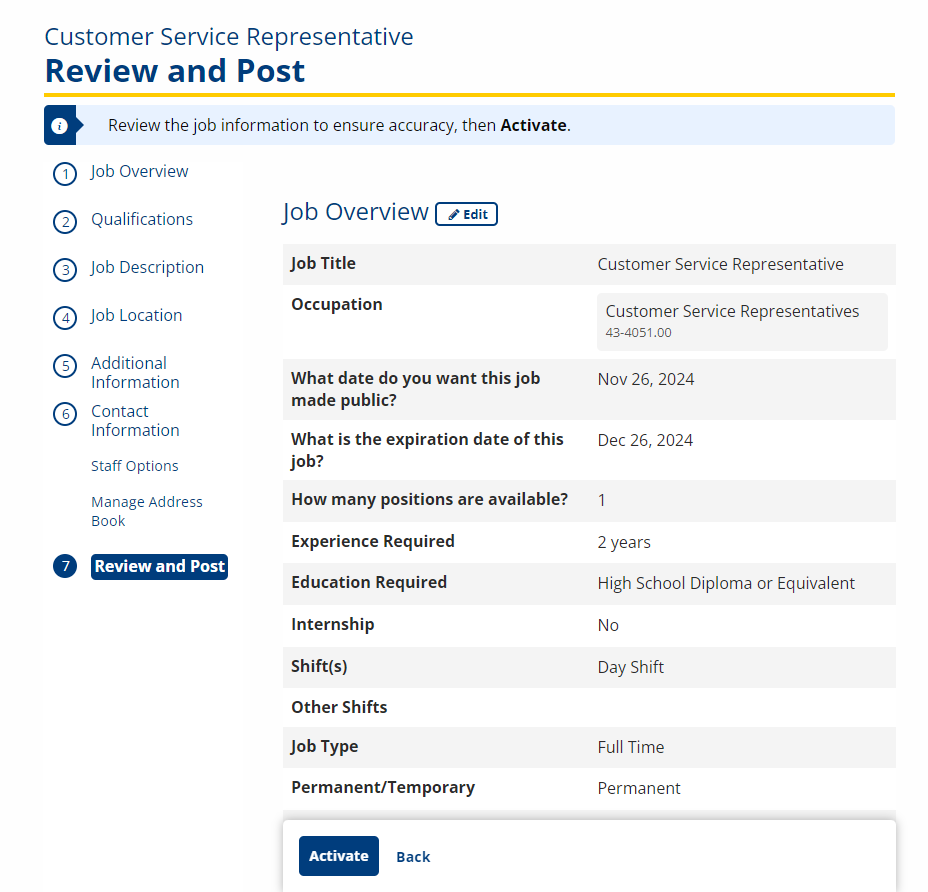
- Job Posting View: Click the appropriate link to preview the job posting.
- Search Results Display is a preview of how the job posting will display to job seekers when they conduct a job search.
- Short Display is a preview of how the job order will display to public who have not logged in to AJL.
- Full Display is a preview of what will display to job seekers when they click on the job title to view the job details.
- When you are satisfied with the accuracy and completeness of the job posting, at the bottom of the Review and Post page, click Activate.
- Job Posting View: Click the appropriate link to preview the job posting.
- After clicking Activate, a confirmation message displays. On the posting date, the job will now be published to the JobLink search engine and visible to job seekers depending on its disclosure level. The job order now appears in the employer’s Active Job Postings list. The job has also been automatically added to your My Job Orders page for convenient follow-up.
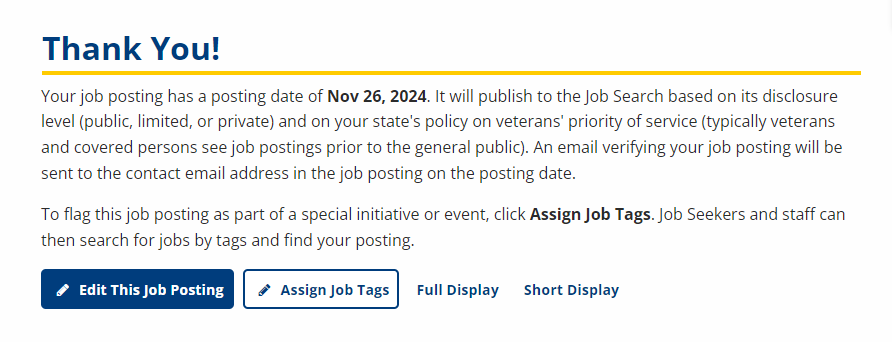
- Jobs are published according to the set veteran's priority in each state. For most states, jobs are viewable by veterans on the publication date, by other eligibles on the next day, and to all job seekers on the third day.
Create Similar Post
Create Similar Post allows a job posting to be duplicated and can be used to quickly generate new job postings from existing job orders. From the Employer Details page, identify the job status of the posting you desire to duplicate. Active, pending completion, on hold, referred, and closed jobs can be duplicated. In this example, an active job is being duplicated.
- From the Employer Details page, click Active in the Jobs tile.
- Click Create Similar Post. The Review and Post Job Order page displays.
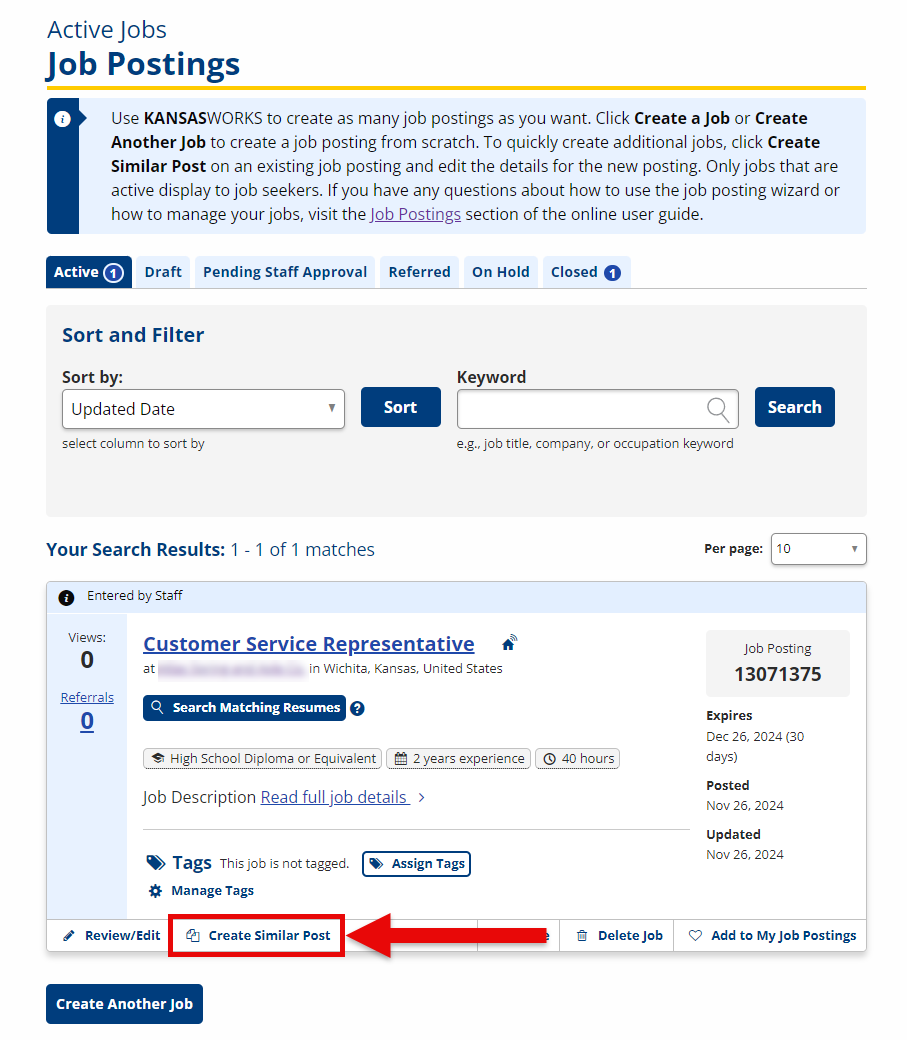
- Review the content of the job posting. Click the Edit link at the top of any section to make changes, or in the left-hand menu, click the area of the posting that needs to be updated.
- Note that the publishing date is set to the current day, with the expiration date set to 30 days in the future (45 days for Maine and Vermont). Edit if necessary.
- When you are satisfied that the details of the job posting are correct, click Activate to make the job posting active.