Job Placement
Use the Job Placement function to add a job placement that was not a result of a referral to an AJL job order. Job Placements are reported on AJL Management Information Reports.
Navigation
Bring the client into context by conducting a Client Search or selecting the client from My Cases. Use the client context menu to navigate to Case Details > Job Placements, or click Job Placements on the Case Details page.
View/Edit Job Placements
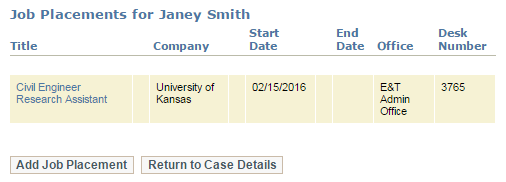
- Navigate to Job Placements. The Job Placements page displays.
- To edit a Job Placement, click a link in the [Job] Title Column. The Job Placement Details page displays, with the current job placement information.
- Make changes as needed, and click Save to save the changes and return to Job Placements. Click Cancel to return without saving changes.
Add Job Placements
- Navigate to Job Placements. The Job Placement page displays.
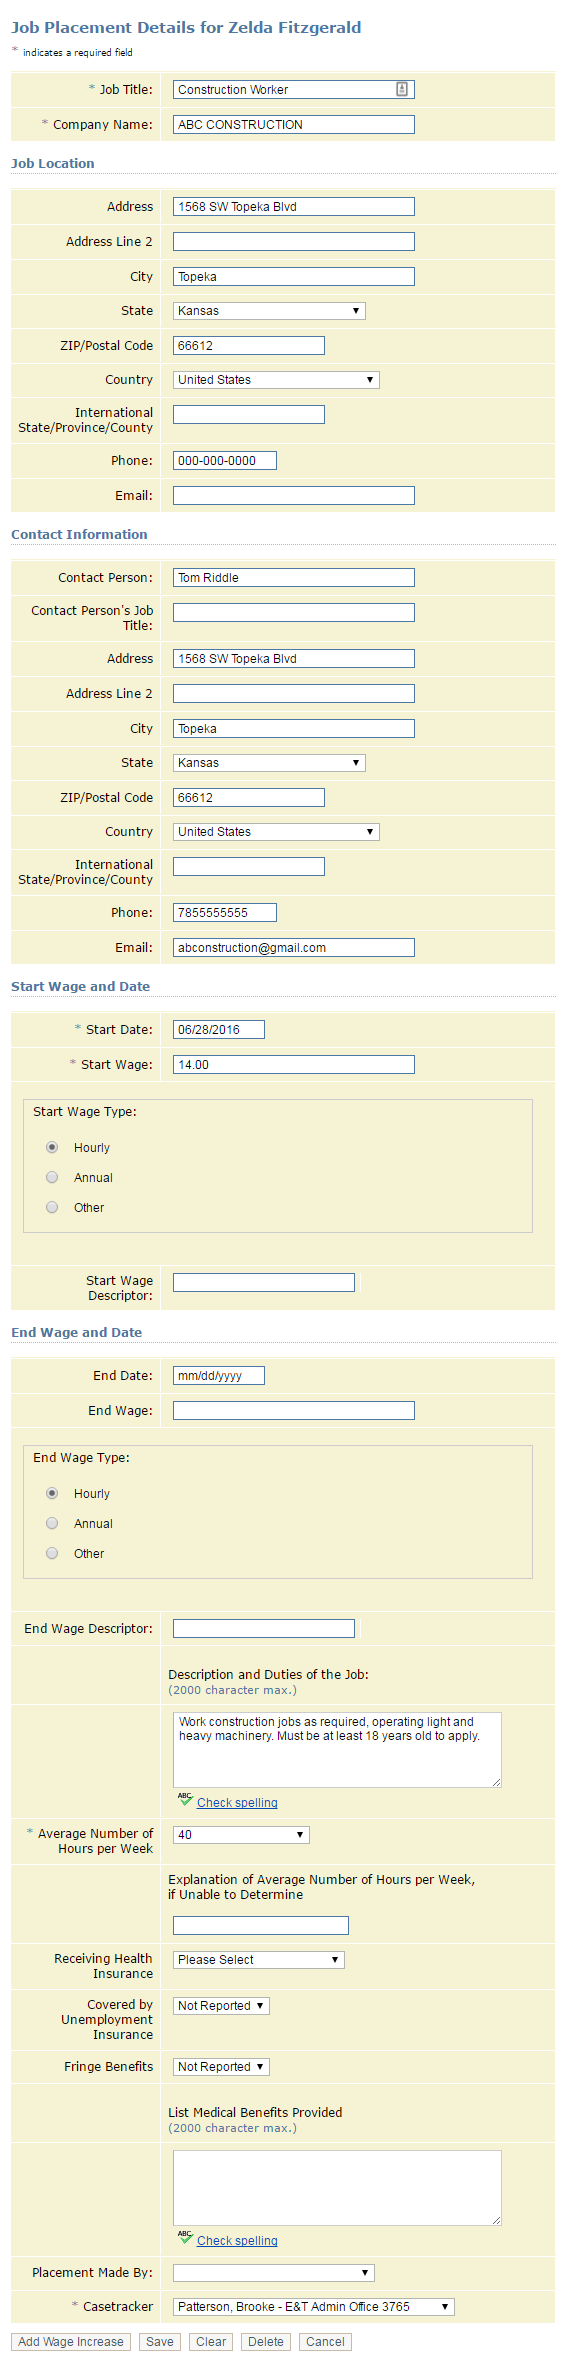
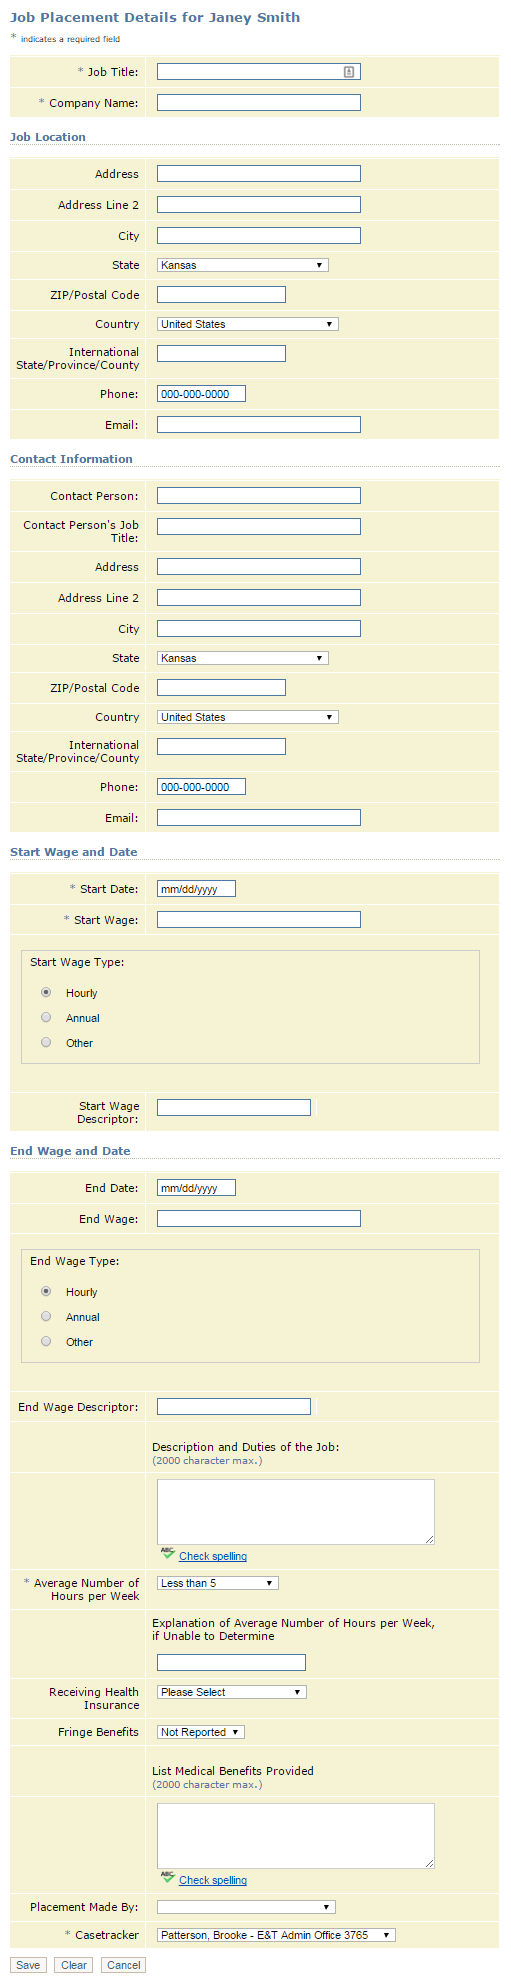
- Click the Add Job Placement button. The Job Placement Details page displays.
-
 Enter the details of the Job Placement according to the following instructions (see drop-down):
- Job Title: Enter the job title of the job in which the client was placed.
- Company Name: Enter the name of the company where the client was placed.
- Address: Enter the address of the company.
- Address Line 2: Enter the second line of the employer address if needed, such as a suite number.
- City: Enter the city of the company's address.
- State: Enter the state of the company's address.
- ZIP/Postal Code: Enter the company's ZIP or postal code.
- Country: If the company is located in a country other than the United States, select that country.
- International State/Province/County: If applicable, enter the international state, province, or county in which the company is located.
- Phone: Enter the phone number of the company. This phone number is the main phone number for the company. A specific phone number for a contact person can be added in the following Contact Information section.
- Email: Enter the email address of the company. This email address is the main generic email address of the company. A specific email address for a contact person can be added in the following Contact Information section.
- Contact Person: Enter the name of the contact person. This is the individual within the company who could be contacted to follow up on the client's job placement.
- Contact Person's Job Title: Enter the job title of the contact person.
- Address: Enter the business address of the contact person.
- Address Line 2: Enter the second line of the contact person's business address if needed, such as a suite number.
- City: Enter the city of the contact person's business address:
- State: Enter the state of the contact person's business address.
- ZIP/Postal Code: Enter the ZIP or postal code of the contact person's business address.
- Country: If the contact person's business is in a country other than the United States, select that country.
- International State/Province/County: If applicable, enter the international state, province, or county in which the contact person's business is located.
- Phone: Enter the phone number of the contact person. If available, use the contact person's direct phone number and/or extension number.
- Email: Enter the business email address of the contact person.
- Start Date: Enter the start date for this job placement: the client's first day on the job.
- Start Wage: Enter the start wage. Do not use commas or dollar signs.
- Start Wage Type: Select a start wage type: annual, hourly, or other. If other is selected, the Start Wage Descriptor field is required.
- Start Wage Descriptor: Enter a description of how the client is paid. For example, by the piece or on commission.
- End Date: Enter the end date for this job placement: the client's last day on the job.
- End Wage: Enter the end wage. Do not use commas or dollar signs.
- End Wage Type: Select an end wage type: annual, hourly, or other. If other is selected, the End Wage descriptor field is required.
- End Wage Descriptor: Enter a description of how the client was paid. For example, by piece or on commission.
- Description and Duties of the Job: Enter text to describe the job and the duties the client will perform on the job.
- Number of hours per week: Select an option from the drop-down: Less than 10, 10–19, 20–29, 30–39, 40–49, 50 or More, Unable to Determine. If Unable to Determine is selected, Explanation of Hours per Week if Unable to Determine is required.
- Explanation of Hours per Week if Unable to Determine: Enter text to describe the client's hours per week. For example, the client may be on call and work as needed. In this case, the hours could vary so widely that an accurate estimate would not accurately reflect the client's hours per week.
- Medical Benefits: Enter text to describe the client's medical benefits with this employer. Recommend adding, at the minimum: Whether or not the client has medical, prescription, and dental coverage; If the plan is single or family; and Cost to client.
- Placement Made By: Select the appropriate option from the drop-down (may vary by state): Job Fair, Newspaper, Other, Other Internet Site, Recruiter, Referrals/Word of Mouth, Staffing Services/Temp Agencies.
- Casetracker: The Casetracker drop-down defaults to the current casetracker. Select a different casetracker as needed. Casetrackers assigned to the client's registration office display in the drop-down.
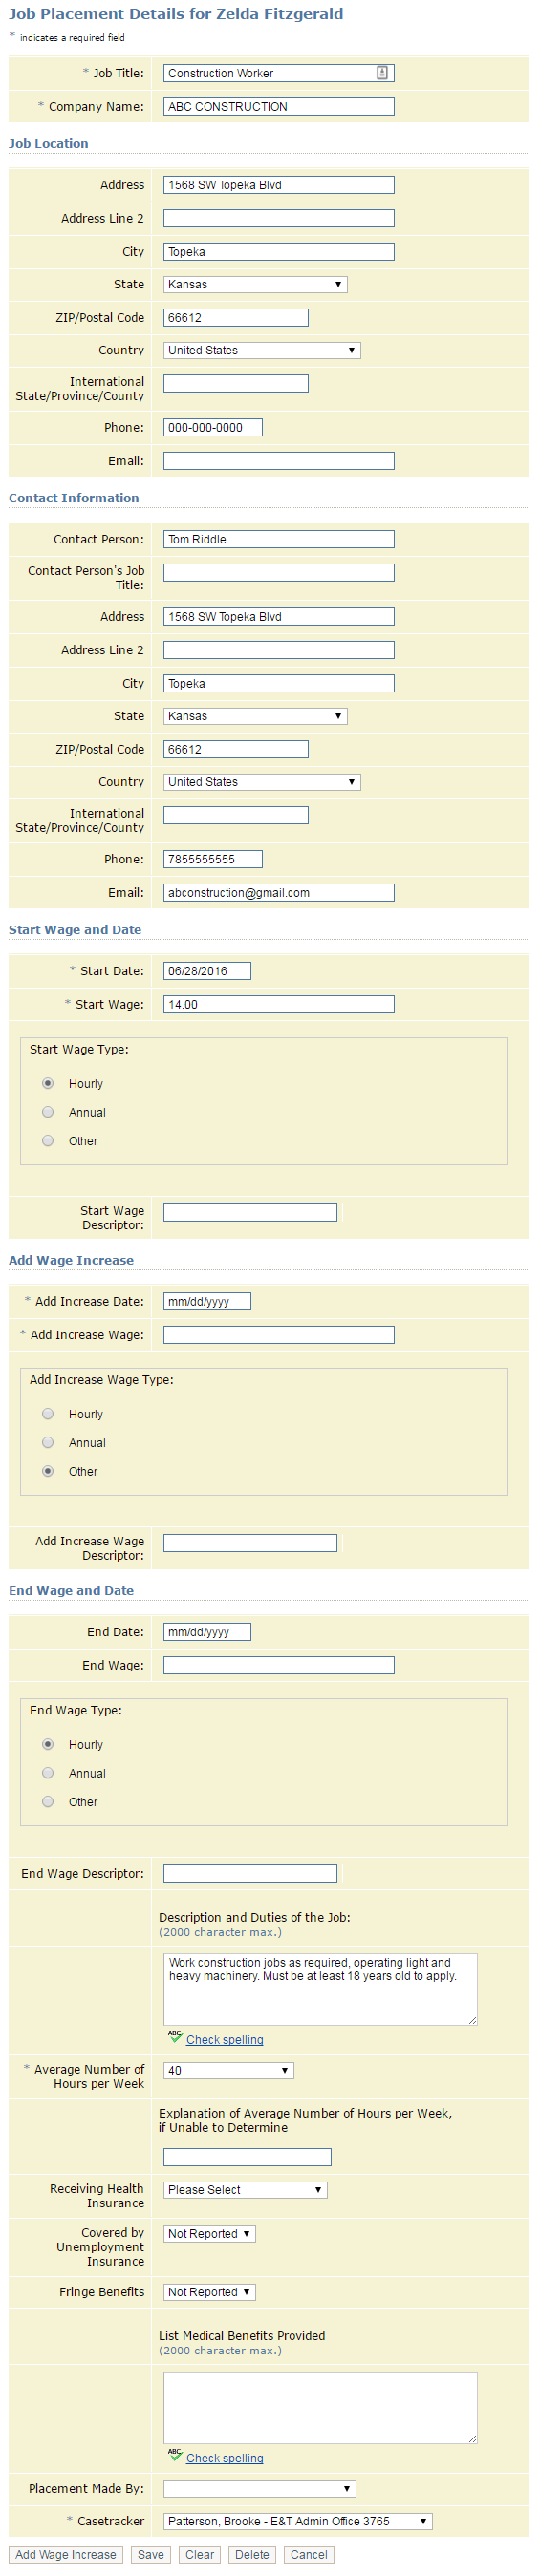
- Add Increase Date: Enter the date of the wage increase for this job placement: the date the wage increase was effective.
- Add Increase Wage: Enter the amount of the wage increase. Enter the wage the client is now earning, not the amount of the increase. For example, if the client was earning $11 and now earns $12, enter $12, not $1. Do not use commas or dollar signs.
- Add Increase Wage Type: Select a wage type: annual, hourly, or other. If other is selected, the Add Increase Wage Descriptor field is required.
- Add Increase Wage Type Descriptor: Enter a description of how the client's pay has increased. For example, by piece or commission.
- Click the Save button to save the information and return to the Job Placements page, or click Cancel to return to the Job Placements page without saving.
Add Wage Increase on Job Placement
- To add a wage increase to an existing Job Placement, click the Job Placement link. The Job Placements page displays.
- Click the appropriate link in the [Job] Title column. The Job Placement Details page displays, with the current job placement information.
- Click the Add Wage Increase button at the bottom of the page. The Add Wage Increase section displays, between the Start Wage and Date section an the End Wage and Date section. Fill out the fields according to the instructions for adding job placements.