Job DevelopmentS
A job development is when staff instigates contact between a client and an employer when there are no current job openings in AJL that match the client's qualifications. A client must be registered in Labor Exchange (LE) prior to adding a job development.
Navigation
Bring the client into context by conducting a Client Search or selecting the client from My Cases. Locate the employer for which you want to add the job development on your My Employers page or by conducting an employer search. Click the employer's name. On the Employer Details page, click Job Development.
View/Edit/Delete Job Developments
- From the Employer Details page, click Job Developments. The Job Developments page displays, with Client Name, Development Date, Interview Date, and Followup Date, as well as a link to view or edit the development, depending on the casetracker's privileges.
- Click the Client Name link to navigate to the client's Case Details page.
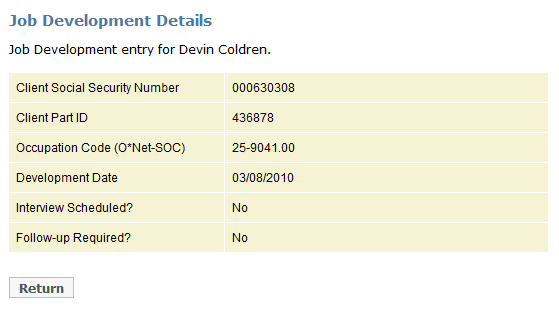
- If you are not the casetracker who entered the job development, a View link displays in the View column. Click View to see a non-editable view of the Job Development Details. Click Return to return to the Job Developments list.
- If you are the casetracker who entered the job development, an Edit link displays in the View column. Click Edit to view the Job Development screen. Edit any information, if necessary.
- To save updates to the job development, click Save. The Job Development Saved page displays, with the option to Send Email or Print Letter, according to the employer's contact information.
- To delete the job development, click Delete. A confirmation page displays. Click OK to delete, or Cancel to return to the job development list.
- Click Return to Details to return to the Employer Details page.
Add Job Development
- From the Employer Details page, click Job Developments. The Job Developments page displays.
-
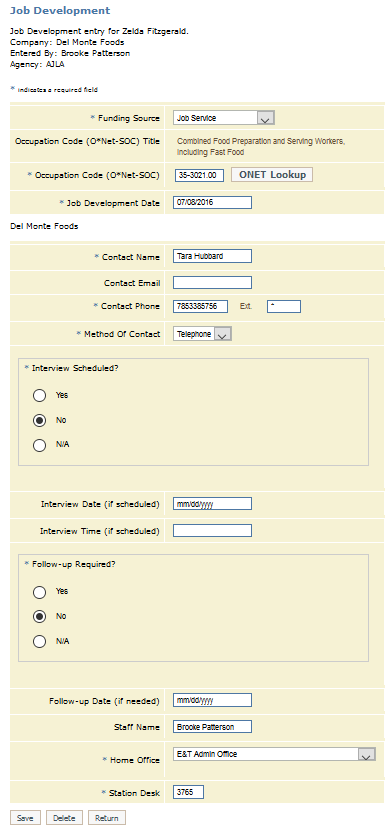
 Click Add Job Development. The [Add] Job Development page displays. Provide, at a minimum, the required information. The following is a description of the fields on the Job Development page (See drop-down).
- Client Social Security Number: Text; Enter the client's social security number, if desired.
- Part ID: Text; Enter the client's participant ID. If the client is in context, this field will automatically be populated.
- Funding Source: Drop-down; Select the funding source.
- Occupation Code: Text; Enter the O*NET-Soc code of the client's relevant work experience.
- To look up the O*NET code, click ONET Lookup. The ONET Lookup page displays. Select Any, All, or Exact. Type in the keyword(s) and click Search. Select the occupation from the drop-down list that best matches the job development. To see a description of the occupation, click Description. Once you have found the occupation you want to add, click Choose Code. The code will display in the Occupation Code field, and the Occupation Code Title will display above.
- Job Development Date: Text/Calendar; Enter the date of the job development; defaults to the current date.
- Contact Name: Text; Automatically populated with available employer contact information; add or edit if necessary.
- Contact Email: Text; Automatically populated with available employer contact information; add or edit if necessary.
- Contact Phone: Text; Automatically populated with available employer contact information; add or edit if necessary.
- Method of Contact: Drop-down; Select the method of contact: Telephone, Visit, Email, or Mail.
- Interview Scheduled? Radio button; Select Yes, No, or N/A.
- Interview Date (if scheduled): Text/Calendar; Enter the date of the interview, if scheduled.
- Interview Time (if scheduled): Text; Enter the time of the interview, if scheduled.
- Follow-up Required? Radio button; Select Yes, No, or N/A.
- Follow-up Date (if needed): Text/Calendar; Enter the date for follow-up contact, if necessary.
- Staff Name: Text; Defaults to the casetracker's name.
- Home Office: Drop-down; Defaults to the casetracker's home office.
- Station Desk: Text; Defaults to the casetracker's desk number.
- Click Add to add the job development. If the client is not an active participant in a program or enrollment under the casetracker's control, an error message will display. Click Return to cancel.
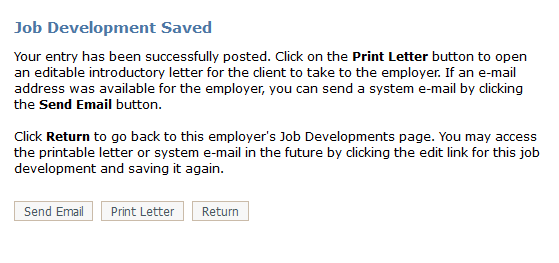
- When the job development is successfully added, the Job Development Saved page displays, with the options to Send Email or Print Letter to introduce the client to the employer.
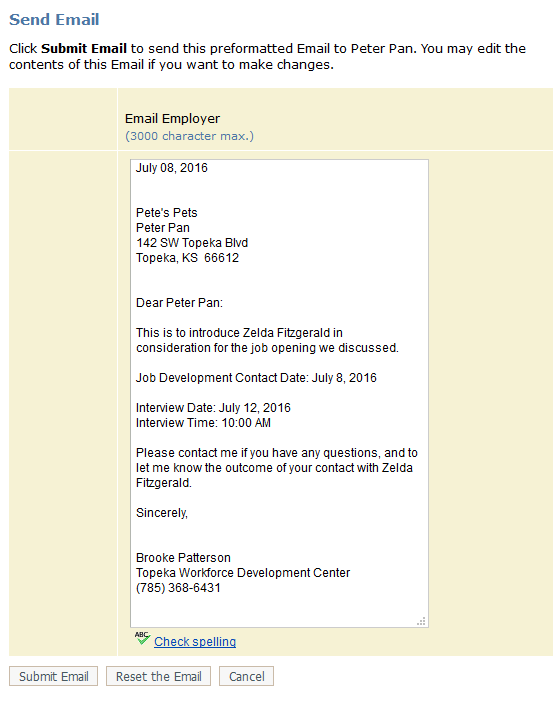
- To send the employer an introductory email, click Send Email. The Send Email page displays, with editable text. Edit the text as necessary and click Submit Email. To undo any changes, click Reset the Email.
- To print a letter to send to the employer, click Print Letter. The letter opens in Microsoft Word. Edit the text as necessary and print the letter.
![[Add] Job Development](../../Resources/Images/D_Employers/JobPostings/AddNewJobDevelopment.png)
Quick Start Guide
Click to view full-screen video in new tab: Adding Job Developments QSG