Add Employer Overview
This section provides high-level task-oriented instructions for adding an employer account and creating staff-assisted job postings. The functions described here are also described in other sections of this guide and are detailed, step by step, in the AJL Quick Start Guides (QSGs). The purpose of this section is to provide instructions for all steps required to add the employer account and add staff-assisted job postings.
Overview of Steps
Step 1: Conduct an Employer Search to determine if the employer has a self-service and/or staff-assisted record.
- If the employer has a self-service account, use that account to complete the employer record.
Step 2: Add the employer record: Create an account and complete the employer's account information.
- Employer accounts must be approved by state-designated staff.
Step 3: Add a job posting.
- Job postings will display to job seekers based on their disclosure level when the account is approved.
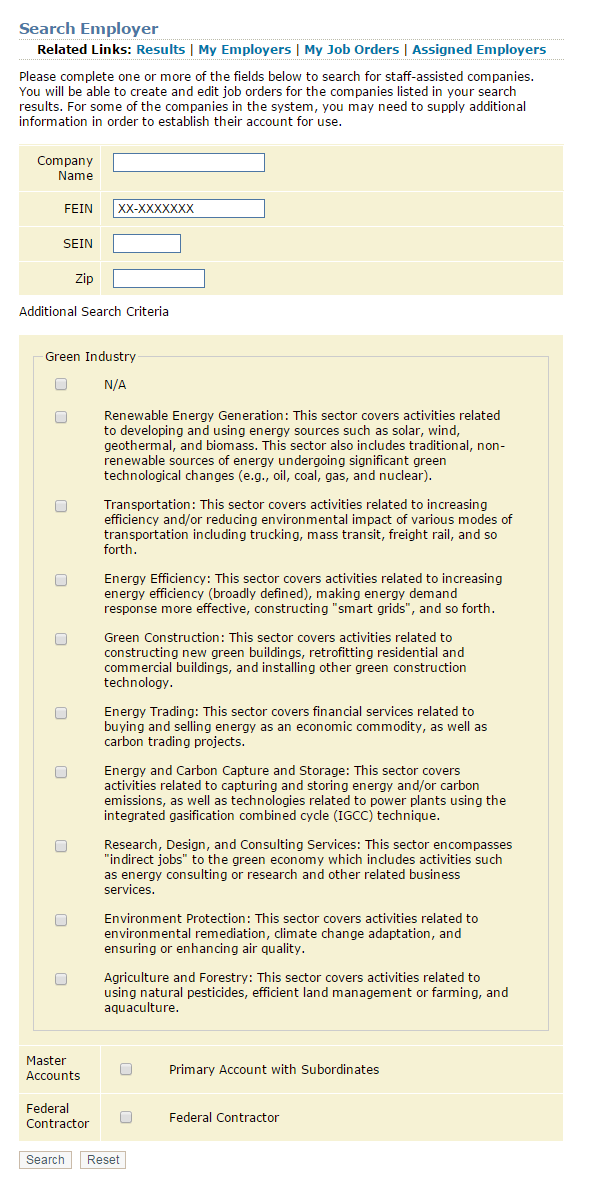
Step 1: Conduct Employer Search
- Navigate to Employer > Employer Search. The Employer Search displays.
- Enter the company's FEIN in the FEIN field. Click the Search button. The Results page displays.
- Searching by FEIN determines that the FEIN is not in the AJL database. However, the employer could have a previous record with the wrong FEIN.
- Click Employer Search in Related Links to search again by name. The Employer Search page displays.
- Remove the previously entered FEIN. Enter the Company Name and click Search. The Results page displays.
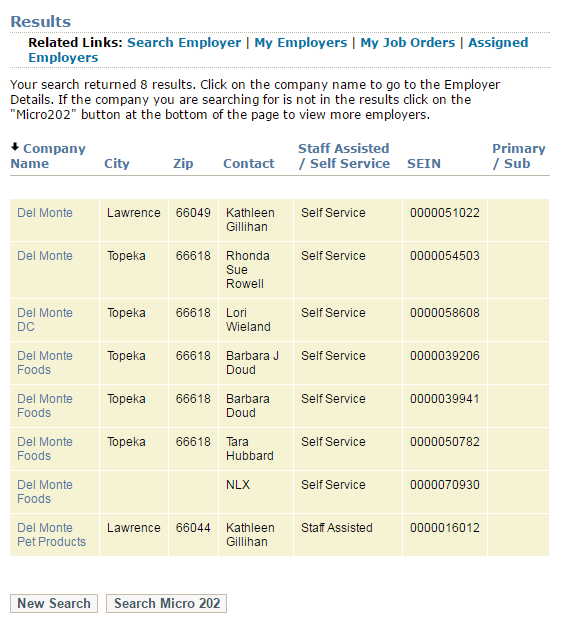
- Use the information displayed on the Results page to determine if one of the records belongs to the employer.
- To reduce duplication of effort and promote accuracy, best practice is to have a single, consolidated employer account whenever possible. Employers should be encouraged to phase out any extra accounts. When multiple accounts for a single employer are truly needed, best practice is to organize the accounts using the Primary/Subordinate function. For more information, see the Primary And Subordinate Accounts.
- If the company does not display in the results, click the Search Micro 202 button. This extends your search to employers who are in the state tax database, but do not have an account in JobLink.
- If the Search Micro 202 finds no employers, you can either click New Search and modify your search criteria, or click Add Employer. Only add the employer if you are confident the employer does not already have a self-service or staff-assisted account in the system.
Quick Start Guide
Click to view full-screen video in new tab: Searching for and Bookmarking Clients and Employers QSG
Step 2: Add Employer Record
-
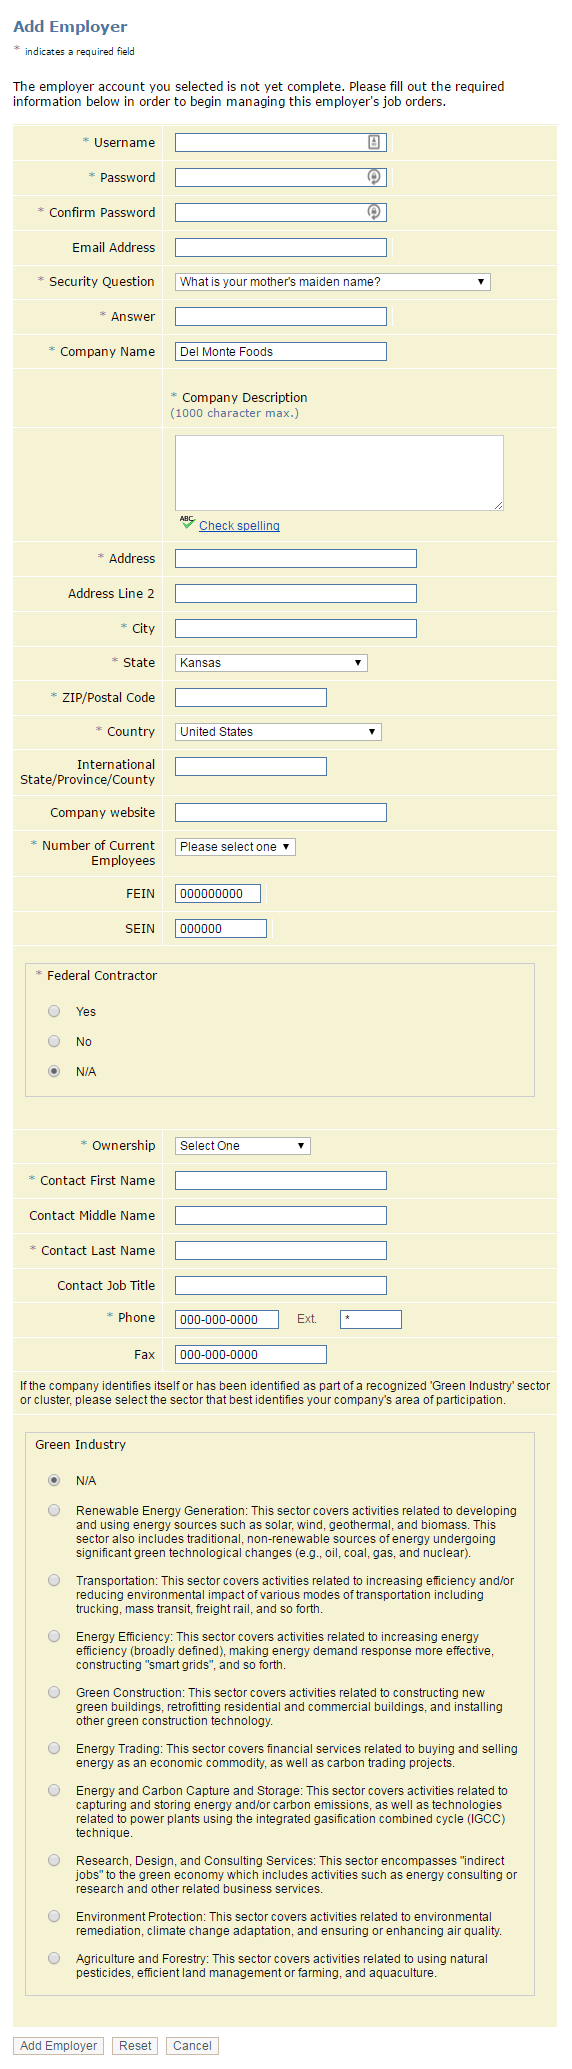
 On the Add Employer page, complete the following fields. Ask the employer to create a username and password. The employer can use this account to log in for self-directed resume search activity and to post job orders. Click Submit.
- Username: Text; Enter a unique and memorable username.
- Password: Text; Must be 8 to 20 characters. ServiceLink requires strong passwords using a combination of letters, numbers, and the following special characters: ! @ # $ % ^ & * ( ) + = { } : ; ? / . , \ ~ -
- Two application variables control whether or not strong passwords are required: one for ServiceLink accounts and one for self-service accounts. AJLA–TS recommends setting the variables to require strong passwords for all users.
- Confirm Password: Text; Re-enter the password.
- Email Address: Text; Enter the employer's email address.
- Security Question: Text; Select a question from the drop-down.
- Answer: Text; Enter answer to question selected.
- Company Name: Text; Enter the name of the company.
- Company Description: Text; Enter a brief description of the company. This will display on all job postings and is a chance to sell the company to potential employees. To check your spelling, click Check spelling.
- Address: Text; Enter the company's street address.
- If the company has more than one location, enter the address information for the main location/headquarters. Additional addresses can be added later in the Address Book located in the job order builder.
- Address Line 2: Text; Enter additional information for the company's address, such as suite number.
- City: Text; Enter the company's city.
- State: Drop-down; Select the company's state.
- ZIP/Postal Code: Text; Enter the company's ZIP/postal code.
- Country: Drop-down; Default is the United States; select another country for international companies.
- International State/Province/County: Text; Enter the state/province/county for international companies.
- Company website: Text; Enter the company's URL, if available.
- Number of current employees: Drop-down; Select from the following options:
- Less than 100
- 100 - 499
- 500 or more
- FEIN: Text/Numerals; Enter the Federal Employer Identification Number of the company.
- The FEIN and SEIN may or may not be required when the account is created, but will be required before the account is approved, except for employers with the ownership type “Individual.”
- SEIN: Text/Numerals; Enter the State Employer Identification Number of the company. See note above.
- Federal Contractor: Radio button; Select Yes if the company is a federal contractor.
- Ownership: Drop-down; Select from the following options:
- Federal Government
- State Government
- Local Government
- Private Sector
- Individual [Does not display for self-service users; select when the business owner is using his/her SSN as the FEIN/SEIN.]
- Contact First Name:Text; Enter the first name of the best person to contact at the company.
- Contact Middle Name: Text; Enter the middle name of the company contact.
- Contact Last Name: Text; Enter the last name of the company contact.
- Contact Job Title: Text; Enter the job title of the company contact.
- Phone: Text; Enter the company's telephone number.
- Ext: Text; Enter the extension for the company phone, if available.
- Fax: Text; Enter the company's fax number.
-
Green Industry: Radio button; If the company identifies itself as part of a recognized “Green Industry” sector, select the sector that best fits the company’s area of participation from the following options.
- N/A: Not a green industry employer.
- Renewable Energy Generation: This sector covers activities related to developing and using energy sources such as solar, wind, geothermal, and biomass. This sector also includes traditional, non-renewable sources of energy undergoing significant green technological changes (e.g., oil, coal, gas, and nuclear).
- Transportation: This sector covers activities related to increasing efficiency and/or reducing environmental impact of various modes of transportation including trucking, mass transit, freight rail, and so forth.
- Energy Efficiency: This sector covers activities related to increasing energy efficiency (broadly defined), making energy demand response more effective, constructing "smart grids", and so forth.
- Green Construction: This sector covers activities related to constructing new green buildings, retrofitting residential and commercial buildings, and installing other green construction technology.
- Energy Trading: This sector covers financial services related to buying and selling energy as an economic commodity, as well as carbon trading projects.
- Energy and Carbon Capture and Storage: This sector covers activities related to capturing and storing energy and/or carbon emissions, as well as technologies related to power plants using the integrated gasification combined cycle (IGCC) technique.
- Research, Design, and Consulting Services: This sector encompasses "indirect jobs" to the green economy which includes activities such as energy consulting or research and other related business services.
- Environment Protection: This sector covers activities related to environmental remediation, climate change adaptation, and ensuring or enhancing air quality.
- Agriculture and Forestry: This sector covers activities related to using natural pesticides, efficient land management or farming, and aquaculture.
- The Employer Details page will display. From the Employer Details page you can manage the employer’s recruitment activities and maintain the employer profile. If this account needs to be a primary account (for example, a company headquarters), or a subordinate account (for example, a franchise, satellite office, or subsidiary), click the Primary/Subordinate Accounts link. View the Primary And Subordinate Accounts accounts section for more information.
- The employer’s account information routes to state-designated staff for approval. The approval process typically takes 24 to 72 hours. If additional information is needed to approve the account, you or your supervisor will be contacted. Both job center staff and the employer can use this account. When logged in, the employer will see the same employer home page they would see if they had created the account, and will only be able to view and access employer-approved functions.
Quick Start Guide
Click to view full-screen video in new tab: Creating an Employer Account
Step 3: Add Job Posting
You can create staff-assisted job postings immediately during the employer account creation, and they will display to job seekers based on disclosure level when the account is approved. Job center staff cannot create self-service job postings, but may be able to view and edit self-service job postings, depending on security permissions. There are six steps to adding a job posting.- Step 1: Post a Job.
- Step 2: Build Job Description.
- Step 3: Job Location
- Step 4: Posting Preferences
- Step 5: Additional Information
- Step 6: Review and Post
For more information, see Add Job Posting. Answer all of the required questions. Some information is optional. However, the more information you provide, the more attractive the job posting will be to job seekers. It will also help AJL provide the employer with better automatic resume matches.
Quick Start Guide
Click to view full-screen video in new tab: Creating a Staff-Assisted Job Posting